Wednesday, October 14, 2020

Writing in Indian Launguages in Linux using IBus


To compose a document other than in English you need transliteration software. In Linux there is one such software that is IBus.Through IBus you can write in any language with ease. 

Installation

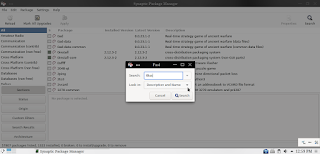
 In Debian start the synaptic package manager click the search button  and type IBus in the search field and press enter.

Image showing synaptic package manager with the search dialog box
Synaptic Package Manager

 Now scroll down and select IBus it will show the dependencies of the packages click ok and again the same with IBus-m17n and click apply in the taskbar. Make sure you have m17n-db package is installed before installing IBus.  

Location & Usage

After installation configure your system to make IBus starts when you login.IBus is typically located in your systray. It will show as EN.

image showing the xfce systray with IBus input system

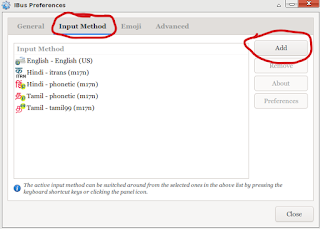
This is your default locale setting. Now right click that icon in your panel and click preferences, a dialog box will open up and then goto Input Method 

Image showing the IBus Preferences Dialog box
IBus Preferences Dialog Box


Click the Add button and click the … in the bottom it will show you more choice and scroll down and you can now select your desired Indian language to write. 


Image showing the input method selection screen after clicking the add button


Image showing the indian language Tamil option


Image showing the type of input method to be selected after selecting the Tamil Language


Image showing the input method options when we right click the IBus interface in the systray

The Indian languages supported in IBus are Assamese, Bengali, Devanagari, Gujrati, Malayalam, Marathi, Tamil, Telugu, Kannada, Kashmiri, Maithili, Oriya, Punjabi, Sanskrit and Urdu. You can now open your favourite text editor and left click the Ibus icon in your systray to select your language or pressing ctrl+spacebar to change the language.

Thursday, February 20, 2020

Installing Adobe Flash in Firefox in Debian

Flash will each its end of life at the end of this 2020 until that time comes we 
must make sure flash is kept updated.
Download the flash player from the Adobe.com website. when selecting use the tar.gz archive for the download. 
Uncompress the archive to your preferred destination. Now open the terminal and  copy the executable file to /usr/lib/mozilla/plugins

sudo cp libflashplayer.so  /usr/lib/mozilla/plugins

now copy the usr files to the /usr

sudo cp -r usr/* /usr 

Restart your browser now your flash is updated to the latest version.

Wednesday, February 19, 2020

Installing Canon LBP2900b in Debian

I had already written an article on how to install the Canon LBP2900B in Debian when SysV init was  the norm but then systemd has taken over the Linux world by storm and only a handful of distro are hanging on to SysV or  had moved on to Runit. 

The current version of the canon capt driver is 2.71 that can be downloaded from the canon website.
before installing the canon driver we have to enable the support for 32-bit if you are the using 64-bit
Debian. The 64-bit driver needs the 32-bit driver installed for proper working otherwise it will only show printer is processing but it won't print.

Run the following commands.

[a] Enable 32-bit.

sudo dpkg --add-architecture i386 
sudo apt update

[b] Install CUPS

If you hadn't installed  cups already install cups and also along with other printer drivers.

sudo apt-get --no-install-recommends --no-install-suggests install cups  system-config-printer system-config-printer-udev printer-driver-gutenprint  foomatic-db-compressed-ppds 

If cups isn't running run the command 
sudo systemctl enable cups.service
[c]  Install the  Drivers

When installing  the  32 bit driver dpkg at first  will  not  install as there will be missing 32-bit libraries 

sudo dpkg -i cndvcups-common_3.21-1_i386.deb 
sudo apt install -f 
sudo dpkg -i cndvcups-capt_2.71-1_i386.deb
sudo dpkg -i cndvcups-common_3.21-1_amd64.deb
sudo dpkg -i cndvcups-capt_2.71-1_amd64.deb

[d] Edit the /etc/init.d/ccpd 

After installing the drivers edit the edit the /etc/init.d/ccpd file with the following info below the 
#!/bin/sh

### BEGIN INIT INFO
# Provides:          ccpd
# Required-Start:    $local_fs $remote_fs $syslog $network $named
# Should-Start:      $ALL
# Required-Stop:     $syslog $remote_fs
# Default-Start:     3 5
# Default-Stop:      0 1 2 6
# Description:       Start Canon Printer Daemon for CUPS
### END INIT INFO

run the following command
sudo systemctl cups restart
sudo /etc/init.d/ccpd start

IMPORTANT: systemd maps the `/etc/init.d/ccpd` script that comes with the printer driver package to the name `cppd 

[e] Create a ccpd2 unit file 

 create a file called ccpd2.service in /etc/systemd/system  with the following content

[Unit]
Description=Printer daemon for Canon printers
Requires=cups.service
After=cups.service

[Service]
ExecStart=/usr/sbin/ccpd
Type=forking

[Install]
# To run the daemon always when the system is up
#WantedBy=multi-user.target
# To run the daemon when a printer is attached
WantedBy=printer.target

Now run 
sudo systemctl enable ccpd2.service 
sudo systemctl restart cups.service

[f] Register the printer in the system

sudo lpadmin -p LBP2900  -m CNCUPSLBP2900CAPTK.ppd  -v ccp:localhost:59687  -E 

[g] Printer port definition 

sudo ls  /dev/usb/

[h] Registering the printer in ccpd service

sudo ccpdadmin   -p LBP2900 -o /dev/usb/lp0 
sudo ccpdadmin

[i]  Restart Cups and ccpd service

sudo systemctl restart cups.service
sudo systemctl restart ccpd2.service

[j] setting our printer as default 

sudo lpadmin -d LBP2900

Resart your computer make sure the printer the connected during boot so it can be recognized to avoid any hiccups.

To check the status run the following command 

captstatusui -P LBP2900 
  
It should show "Ready to Print" then it means you have correctly installed your printer. 

If the captstatusui reports a socket error then run the following commands 

sudo systemctl stop  cups.service
sudo systemctl start cups.service
sudo /etc/init.d/ccpd restart


References:
[1]https://underr.space/notes/it/it-0012.html
[2]https://github.com/gkr09/Canon-CAPT
[3]https://gist.github.com/akikoskinen/98b18251ca05b152d2df3548d057ef49#file-ccpd2-service
Wednesday, July 24, 2019

Converting proprietary formats to native formats in qemu

Virtual box stores its image in vdi and vmware with vmdk format. To convert to qcow2 or raw format use the following command

qemu-img convert file.vdi -O qcow file.qcow

-O option is used to specify the format

The formats supported by qemu are
  1. raw
  2. cloop
  3. cow [only on windows]
  4. qcow
  5. qcow2 [has many advantages, higly recommended]
  6. vmdk
  7. vdi
  8. vhdx
  9. vpi
  10. bochs
  11. dmg
  12. nbd
  13. parallels
  14. vvfat
Remember you can convert images  only between these formats.

Reference

https://virtuallyfun.com/wordpress/2011/04/30/qemu-disk-image-conversion/

Redhat Qemu Documentation

Qemu: How To transfer file from host to guest using Qemu-nbd

In the last post we have seen how to transfer  files  using guestfs-tools to mount an image to transfer files. In this method we are using a native client called qemu-nbd to transfer files. Make sure qemu-utils have been installed if not run

apt-get install qemu-utils

After installing first run

sudo modprobe nbd max_part=8

This command loads the nbd module and instructs the kernel we will manage upto eight partitions. To mount first we need to connect the image to the qemu network device block driver.

 sudo qemu-nbd --connect=/dev/nbd0  hq.qcow2

Now check the partitions  of the device /dev/nbd0

sudo fdisk /dev/nbd0 -l

this command will list the partitions in the image. Now we can mount the image using the mount command.

sudo mount /dev/nbd0p1  /mnt

to unmount the image run

sudo umount  /mnt
sudo qemu-nbd  --disconnect /dev/nbd0

With this command you can modify your contents in your image. If you are mounting  a  linux distro image make sure you are modifying only the home folder and nothing elsee other wise it will corrupt your image.

Popular Posts